Behavioral data is one of the most powerful pieces of information marketers have to understand their customers, refine their marketing plan, and reacting to customer needs to improve their engagement with the brand. Email engagement metrics, such as opens, clicks, and unsubscribes, play a pivotal role in analyzing customer interactions and tailoring future strategies.
In Salesforce Marketing Cloud, all this behavioral information is stored in system-managed tables called Data Views, which store the last 6 months of interactions between customers and the content they receive through SFMC.
There are 23 listed Data Views (and 4 extra hidden) whose relationships can be found in the image below (or downloaded in high quality here):
You can also check all the Data Views in a more visual and interactive way here.
All the existing Data Views are fully integrated into DESelect, meaning you can find them listed on the Available Data Extensions when you create a Selection, so you just need to worry about choosing the ones you need, and DESelect will do the rest.
The Data Views are easy to identify since their name always starts with an underscore (_Sent, _Open, _Click, and so on).
The Basics
When you first start working with Data Views, there are a few of them that are more handy than others. Our recommendation is that you should start working the basic use cases and then keep looking for more advanced scenarios according to your needs.
Before getting our hands dirty, you have to take into account that Data Views are treated as a log, which means they are not normalized tables and you may find some duplicated information in them. In this section, we are going to break down the most common Data Views and the characteristics you have to keep in mind when working with them.
_Job Data View
In the _Job Data View, you will find the overview information about the emails you send.
You can filter over a specific email using EmailName, or use it combined with the Subject or the From Name into the Target Data Extension to do further analysis.
The JobID field is going to be the matching column on almost all the relations you are going to set from here on, so this is a good starting point.
_Sent Data View
The _Sent Data View stores all the information regarding email sends done to customers.
This is the Data View you need if you want to review who received a specific email and when, but you are probably going to need to combine it with the _Job Data View in order to filter the email you want to review by name.
_Open Data View
The _Open Data View stores all the open interactions a customer does with a specific email. This means that, if the customer opens the email twice, you are going to have two records in this Data View, one with each open date and time.
When working with this Data View, you need to take multiple things into account:
- Sometimes the open and click events don't match, so for example you can face that a customer doesn't appear in the open Data View for a specific email but it appears on the click one (which should be impossible, because for clicking some content you first have to open it). You can read more about the open and click behavior here.
- Some open events are duplicated, showing the same exact EventDate with millisecond precision. If you are planning to get info about how many open customers do over each email, you will have to deduplicate first before doing the aggregation field.
- IsUnique field can also have some misleading information, so if you want to get the number of opens an email got, the best way to do it is by applying the aggregation over the SubscriberKey field (so you will have the count of distinct customers that opened each email).
- The iOS 15's new feature "Mail Protection Protocol" is definitely going to affect the open rate and the data in this Data View for almost every Apple customer. You can read more about how it can affect you here.
- You can find some extra insights regarding open information (like device used or geofences) using the Data Extract activity in the Automation Studio.
You can combine the _Open Data View with the _Sent or _Job Data View using the same matching column we saw before:
_Click Data View
The _Click Data View stores all the clicks done by customers in the content you send them through emails in Salesforce Marketing Cloud. Its behavior is similar to the _Open Data View, so if a customer clicks on the same content twice, we are going to see two records in this Data View with a different EventDate.
The content link is presented in multiple ways to simplify your work with it:
- In case you use AMPScript to enrich your URLs, you can work with the URL field to see the link before applying the personalization logic. If you have a content link like https://deselect.com/?name=%%Name%%, the URL field will show it exactly like this, without replacing the %%Name%% variable with any value.
- If you want to see the link as it was sent to the customer (with all the variables replaced with its value), you can use the LinkContent field. In the previous example, LinkContent will contain https://deselect.com/?name=Deedee (supposing Name = Deedee for this customer).
- Just like with the open events, click events can also be duplicated. Follow the same process explained before if you want to work with aggregations.
- IsUnique field also has the same problem mentioned in the Open Data View, so you would want to follow the same recommendations explained before.
You can combine the _Click Data View with any of the above using the JobID field as the matching column.
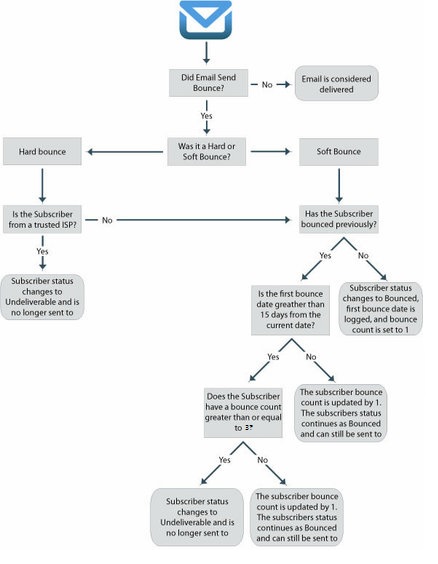
_Bounce Data View
Refer to the _Bounce Data View if you want to review the bounces you are facing in each email sent.
It can be useful to do further analysis on customers having troubles with bounces, as you can review the bounce reason and apply different procedures to solve them (if applicable). You can learn more about the existing bounce reasons here.
_Subscribers Data View
_Subscribers Data View doesn't have behavioral data, but it's key because it keeps the updated status of each customer in your Salesforce Marketing Cloud environment.
You will find four different statuses (active, bounced, held, unsubscribed) that will mainly depend on the bounces each customer has from the emails you send them.
Salesforce Marketing Cloud will automatically filter out the sends to customers that are Unsubscribed (if your unsubscribe settings are based on the Salesforce's OOTB Profile Center) or Held statuses.
DESelect Use Cases
In this section, we are going to discuss some use cases you could try out working with Data Views within DESelect.
NOTE: If you have any questions on how to do it or you would like to discuss best practices on your concrete case, don't hesitate to contact us through your Customer Success Manager and we will be happy to help!
Update Contact Campaign to Held Customers
As we mentioned before, SFMC automatically blocks all the emails you try to send to customers that have a Held status because it has determined that it is an invalid email after several unsuccessful tries to reach them. This is done to prevent you from having a bad IP reputation that will affect the rest of the sends you perform to valid email addresses.
If you want to get these customers back on track so you can send them all your content through email, you can try to reach them using a different channel and ask them to update their contact details.
For doing that, you can use the _Subscribers data view combined with your Sendable Data Extension containing all your contacts, filtering the ones that have a Held status and then creating a journey to impact them through SMS or Push, or exporting that information so the Customer Support team can reach them using other channels.
Journey Interaction Report
Another interesting use case you may want to analyze is creating a custom Data Extension that combines all the information that may be useful from the previous Data Views, so you can use it in all the future use cases you may face.
For example, you can create a Data Extension with the following structure:
| CustomerID | JobID | EmailName | Sent | Open | Click |
| 1 | 1 | Test Email | Yes | No | No |
| 2 | 1 | Test Email | Yes | Yes | No |
| 1 | 2 | Another Email | Yes | Yes | Yes |
You can schedule the selection that generates this table so you can have updated information every day, and you can easily extract the people that opened a specific email (filtering Open = "Yes") or get all the emails sent to a customer and his interaction with them (filtering CustomerID = "X")
Preferences based on Interactions
If you classify all the content you send to customers using UTMs or different web sections, you can analyze the clicks they do and group them into your existing classifications. With this information, you can try to determine the preferences of each customer in one Data Extension that you can later use to segment or personalize the communications you send to them based on it.
Control Email Saturation
If you have saturation rules that you want to apply on a recurring basis, you can create a scheduled selection to determine if you are sending each customer more volume than you should.
With this Data Extension, you can later apply filters so you don't over-saturate customers that have reached a specific limit in a period of time, avoiding the unsubscription.
Avoid iOS15's MPP Issues
As we discussed before, the Mail Protection Protocol feature can affect your open rate and all the open-based functionality in Salesforce Marketing Cloud, like Engagement Splits or A/B testing.
To reduce this impact, you can use the Open Data Extract Activity in the Automation Studio to set a Data Extension regarding the details of the device your customers are using, and then use DESelect to:
- Filter out the customers using Apple devices when you are creating a campaign with A/B testing
- Compare Open Rate between Apple customers vs the rest, to get an insight on the real impact you are experiencing with iOS 15.
- Determine separate paths for Apple and the rest, so you can compare metrics between them.
Creating Selection Templates for the most recurring use cases
Apart from the above, you can also set Selections as Templates for the most important use cases so the rest of the team can easily reuse the structure you have previously created without any effort
You can read more about Selection Templates here.
Related Articles
How to use Data Views in SFMC? A guide to select contacts that are known subscribers
Example - Select Contacts that have not received any emails in the last 14 days
What are Behavioral Filter Sets?
Comments
0 comments
Please sign in to leave a comment.